Hi, all.
My name is Yusuf Odukoya. I am the founder of Branditechture Design Agency.
In this post, I will teach you everything you need to know regarding WordPress and Elementor, and how to build great websites with these amazing technologies — even if you have never touched a piece of code before. That means you are not required to know how to code in order to build websites.
Let’s go!
But wait.
We need to demystify quite a few things in order to help you achieve a faster understanding of this course.
What is WordPress? What is Elementor? What are the important parts of a website?
Well, grab a snack and a chilled drink. This is probably going to be the longest post you have ever read on the internet.
What is WordPress?
WordPress is the technology behind nearly 45% of all websites on the internet today. This powerful website builder and Content Management System (CMS) aims to make it possible for anyone to create a website in minutes. Today, at least, 2 in every 5 websites is built with WordPress.
Why use WordPress?
The two major reasons why we use WordPress to build websites are;
- It is completely free.
- It can be easily used to build website pages without coding.
There are more than two reasons why people use WordPress, but those two above are the most notable reasons. If you want to know about the other reasons, read this post.
What is Elementor?
Elementor is a visual drag-and-drop page builder. Elementor exists as a free plugin on WordPress and can be used in lieu of the native WordPress page builder known as Gutenberg.
It allows you to quickly craft dynamic website pages on WordPress without having to code.
Why do most people use Elementor?
WordPress has dozens of other page builders such as; Visual Composer, Beaver Builder, Site Origin Page Builder etc., however, Elementor is simply the best and most popularly used page builder for the following reasons;
- Very accurate real-time page previews in the page editor screen.
- Smooth learning curves due to consistent navigation.
- Easy to install and get started.
Now that you know the relationship between WordPress and Elementor, let’s take a look at the anatomy of a typical website.
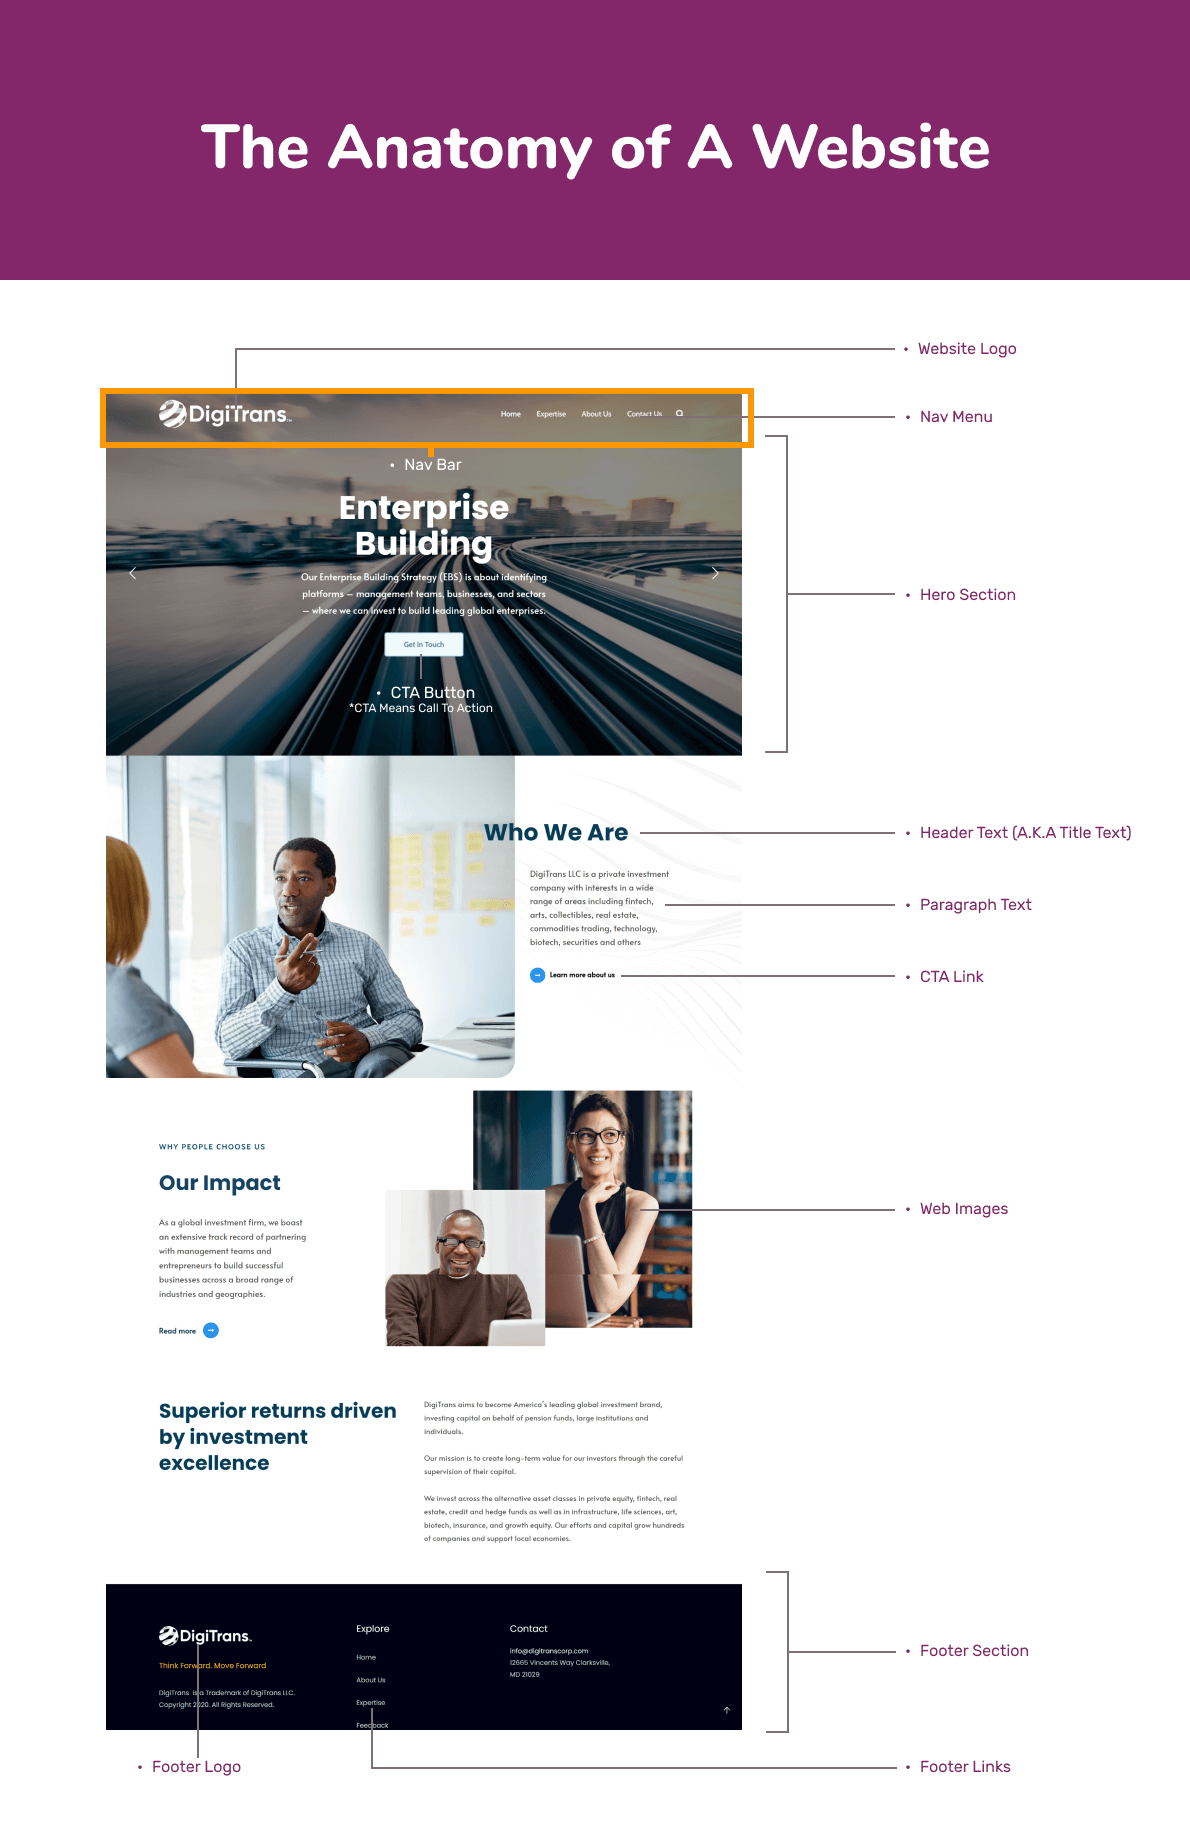
The Anatomy (or Parts) of a Website. (Download Image)
TIP: Take a minute to study the labelled image above before you continue.
Prerequisites for Hosting a Website Online
To build and serve any website on the internet, you need two things;
What is a Domain Name?
A domain name, commonly referred to as “web address”, is a set of characters that people type into a browser address bar in order to locate your website on the world wide web. e.g. www.google.com.
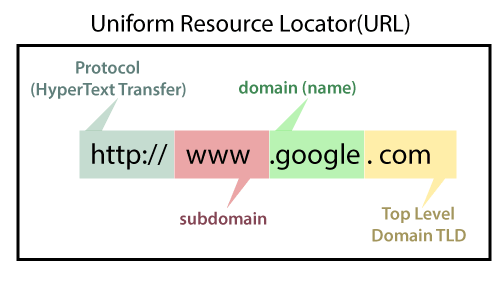
Parts of a Domain Name
It functions on the Internet in a similar way to a street address in the physical world. Buying a domain name is like having a road to your house. Without a domain name, no road leads to your website, making it inaccessible!
FACTS ABOUT DOMAIN NAMES
- 👉🏽 No two websites can have the same domain name it is always a first-come, first-serve thing.
- 👉🏽 To have a website, you will need both a domain and a hosting plan.
- 👉🏽 The part of the domain after the dot is called TLD (or Top Level Domain)
- 👉🏽 A domain name is so important that you can’t buy a website hosting plan if you don’t have a domain name, the same way you can’t build a house without first identifying a road to that piece of land.
What is a Web Hosting Plan?
Web hosting, also called Website Hosting, or simply called Hosting, is a service that allows you to upload (or host) your website or web pages onto the world wide web.
Web Hosting and Domain Names are two different things, but both are required in order for us to build any website. It is impossible to create a website with only one of them.
Web Hosting holds your website files. This is the same way your house hosts your home furniture. So, think of a web hosting plan as your house and your website as furniture.
The bigger your hosting plan is, the more files you would be able to store. Similarly, the bigger your house is, the more furniture it can hold. Got that?
Remember, we had previously talked about domain names?
A domain name (e.g www.margaret.com) is like a street address (e.g 15, Margaret Road, Lagos), it makes it possible for your website to be accessible. Without it, it would be impossible to even create a website in the first place. Because can you build a house in the air?
THINGS TO KNOW
- 👉🏽 Host (verb) – To upload a website and associated files onto the webserver
- 👉🏽 Host (noun) – Also known as “Web Host”, is a hosting service provider
- 👉🏽 Hosting – This can also be used to refer to “Hosting Plan” or “Hosting Package”. It is the service that allows us to install and host WordPress on a web server so that our website can be built on it.
- 👉🏽 Hosting Provider– This is a company that provides a Web Hosting service. The best hosting provider for beginners to host their website is Namecheap. I will show you how to purchase a Domain Name and Hosting Plan on Namecheap on the next page.
How to Purchase a Domain & Web Hosting Bundle on NameCheap
If you have already purchased a domain name and hosting plan before, then you can skip to the next page.
If you haven’t, then follow these easy steps;
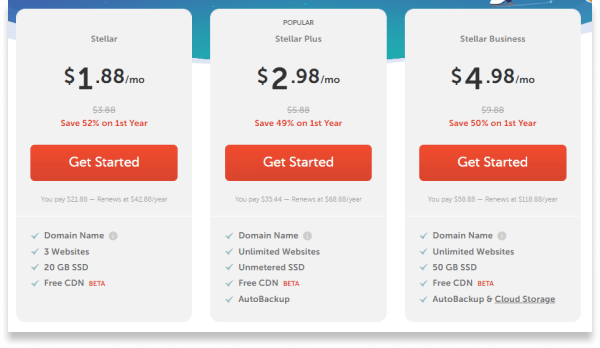
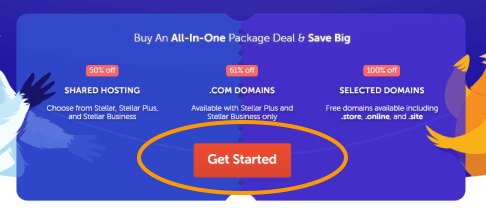
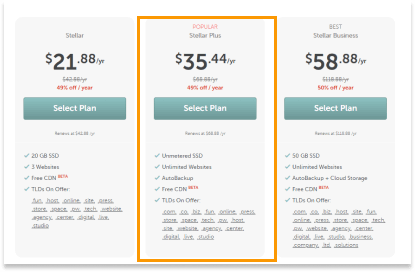
- Visit https://namecheap.pxf.io/start and click “Get Started”
- Under the Stellar Plus Plan, Click “Select Plan”
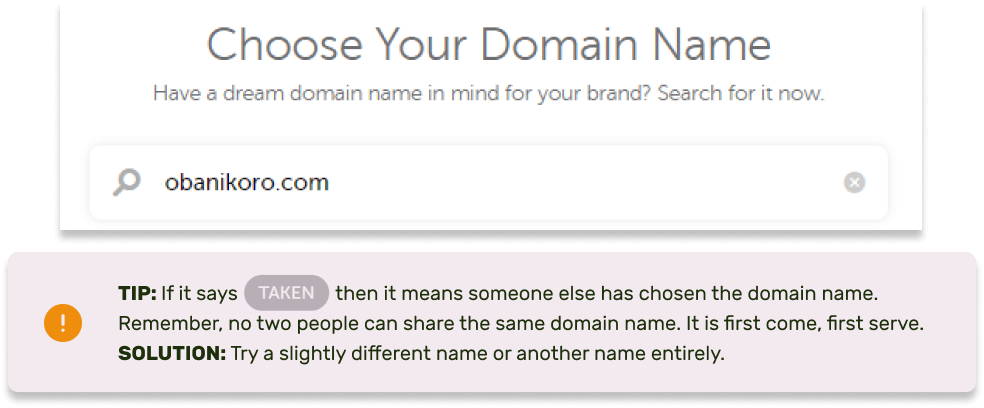
- Choose Your Own Domain Name: Type in your domain name (e.g yourbrand.com) as shown in the image below.
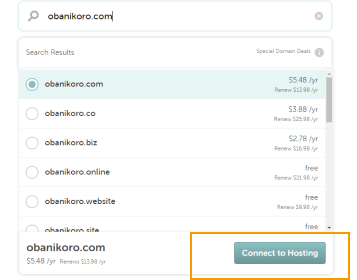
If the domain is available for you, then you’ll notice it would automatically select it for you in the search results (Good! 💪🏽). Just Click “Connect to Hosting”,
But if it says “Taken”, choose a different domain name. - Confirm Your Choices by Adding Them To The Cart
After connecting your domain to the hosting, confirm your choices by clicking Add to Cart
Confirm Your Order and Grab a Namecheap accountJust scroll to the far bottom and click “Confirm Order”, then on the next page, create your Namecheap account. If you already have a Namecheap account, just Log In instead. - Confirm Order again
After Logging in to your Namecheap account, you would need to click on the “Confirm Order” button once again. Enter your payment details, and If everything goes as planned, you should get an email confirmation and transaction receipt.
That’s it! Congratulations. You just bought a Web Hosting Plan and a Domain Name package from NameCheap.
On the next page, I will teach you how to prepare it for WordPress and actually install Word
Getting Your Domain & Hosting Ready for WordPress
You have just bought a domain and hosting on Namecheap, but before we start using the Domain and Web Hosting, we need to check a certain setting which I am about to show you now.
This setting is important in other to correctly point your
domain name to the hosting where WordPress would be installed.
In most cases, it is already set by default, but we still need to check it anyway 😉.
Step 1: Login To Your Namecheap Account
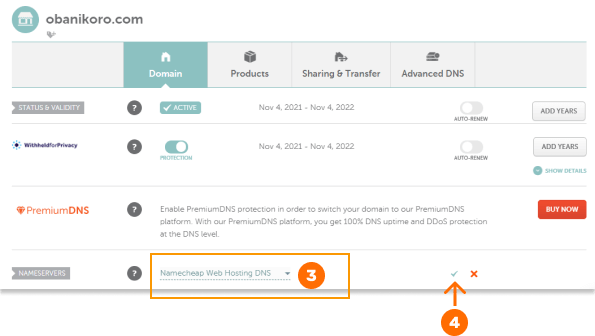
Simply log in to your Namecheap account by visiting ap.www.namecheap.com and navigate to the Domain List tab. Next, click the Manage button for the domain name we want to use to install WordPress.

Awesome! Now check to make sure that the Nameserver dropdown menu is set to Namecheap Web Hosting DNS. If you had to change it, make sure you click the teal-colored tick icon to save your changes.

Once you’ve made sure that the Nameserver setting is set to Namecheap Web Hosting DNS, then it’s time to begin the WordPress installation procedure.

Installing WordPress Via cPanel
There are a couple of alternative ways to install WordPress on NameCheap, but the simplest and less error-prone method is via WordPress Manager by Softaculous, which can be found inside cPanel. So, Let’s get this party started ASAP!
Make sure you are in your Namecheap Dashboard (You should know how to get there by now). Once there, click on Hosting List, then click on the GO TO CPANEL button on the hosting account we want to install WordPress on.

Go to cPanel? Wait! What is cPanel?
cPanel is a piece of software that comes bundled with every hosting plan you buy. In fact, cPanel is the engine room of any hosting plan, because it has all the tools that can help us install and manage WordPress through a sweet user interface. If not for cPanel, we would be installing WordPress with a bunch of code known as SSH Commands. I hate writing codes, don’t you? Okay, thank goodness for cPanel!
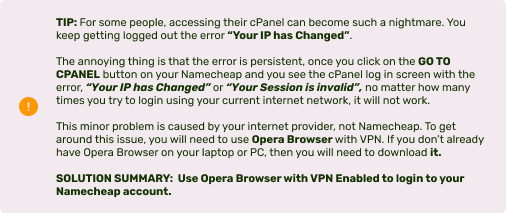
If you are hearing “Opera Browser” and “VPN” for the first time and you don’t
know where to start, read the following resources;

How do I install the Opera browser? : https://is.gd/Q77ZI
How do I enable VPN in Opera browser? https://is.gd/4OYuh9

Once you are set, log in to your Namecheap account again, and GO TO CPANEL like in
the previous step. You’ll see that the error doesn’t occur with Opera Browser when
VPN is enabled and you should be able to log in cPanel.
Installing WordPress in cPanel with WordPress Manager
You’ve made it to your cPanel. It is now time to install WordPress on our hosting plan. To do this, we’ll need a tool called WordPress Manager by
Softaculous.
Now, let’s look for it in cPanel!

… We found it! Click on it and click the “Install” button on the next screen.
WordPress & WP Admin Account Setup

Good! Now, in this stage, we don’t need to do much at all. We just need to fill only the important details to install WordPress, so leave the rest as is. Here are the important details;
- Installation URL – the website address where WordPress would be installed. CAUTION: Leave the adjacent “In Directory” field blank.
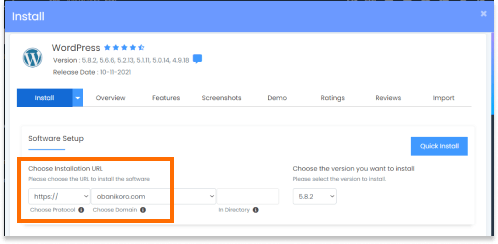
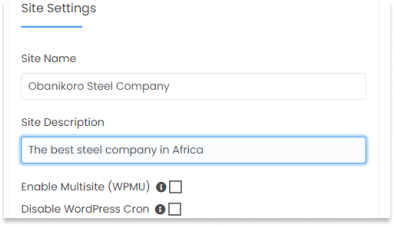
Site Name – The name of your Website e.g Obanikoro Steel Company
Site Description – A description of your Website in a maximum of one sentence.
Admin Username & Password – Username and Password you would use to login to your WordPress Dashboard after installation. CAUTION: Make sure you don’t forget these login credentials, so I think it’s good you jot them down and keep in a safe place.

Once you have added your Admin Username and Admin Password, scroll to the far bottom of the page and click Install
The Softaculous installer would then check your submitted data. This stage typically lasts 10 seconds, but may last up to 30 seconds depending on your network conditions.

If everything goes as planned, you’ll receive congratulatory feedback.

Awesome!
Now, you can check your website address, [www.yourdomain.com] from any internet-enabled device and you’d confirm that WordPress has been successfully installed.
Now, it’s time to start building our Website on top of WordPress. This is where the real work starts.
To make any changes such as adding pages, changing the website’s looks and feel, adding menu items, adding images, building the header and footer, building the website homepage, adding additional features, changing colours, changing the website icon, and so on, we would need to have access to the administrative dashboard. Remember when I told you not to forget your admin username and password? Now here’s where we need it.
Subscribe for updates
Did you forget your admin password or username? I hope not (I’ll be very angry at you if you did ). Well, no one is above mistake, so just in case you can’t remember your site’s admin password again, log in to your cPanel from Namecheap, Click WordPress Manager by Softaculous, and then follow this guide; https://is.gd/BwG5W2
Accessing Your WordPress Admin Dashboard
As mentioned earlier, we need to be able to access our admin dashboard if we are to make changes to our website. Here’s how to access your website’s admin dashboard
- Enter your website address followed by /wp-admin. e.g obanikoro.com/wp-admin

- Enter your admin username and password and click Login
That’s it!

Welcome to your WordPress Admin. Time to start installing Plugins and Themes!
Top 5 Default WordPress Settings to Change
After logging in to the Admin Dashboard of your WordPress website for the first time, it can feel overwhelming to figure out where you should start as a new user. However, there is no need to worry for I am with you. The truth is that there’s no need to tinker with every setting WordPress has to offer.
In this part, I will show you 6 important settings that you should change after installing WordPress.
- Time Zone Settings
From your Admin dashboard, go to Settings > General
Set your timezone to your local time zone - Delete Default Posts and Pages
To delete a page or post, hover your mouse on it and click “Trash”
Go to Posts > All Posts and delete the Hello World! Post
Go to Pages > All Pages and delete the pages titled “Sample Page” and “Privacy Policy”. - Remove ALL Default Plugins (Akismet, Hello Dolly!, w3 Total Cache, etc) You can’t remove an active plugin in WordPress, so you’d have to first deactivate them before deleting them. Deactivate and delete all of them. We don’t need them.

- Change Permalink Settling
Navigate to Settings > Permalinks, then set it to “Post name”. Scroll Down and click “Save Changes” - Add Site Favicon
A favicon is the website icon located on the left side of the title bar. Replace the default WordPress favicon with your own icon.

Go to Appearance > Customize > Site Identity > Change Image then upload your preferred image to be used as a favicon. - Delete Unused Themes
Themes are used to change the look and feel of WordPress websites but you can’t use two themes at a time so there is no use for keeping any unused themes.
In fact, we don’t need any of the default themes because we are going to install a new theme; either “Hello Elementor” or “Astra” very soon. Similar to Plugins, you can not delete an active theme (i.e your current theme) but you can delete others. It is a very good practice to delete unused themes and we are going to do just that. To delete an unused theme, hover your mouse on the theme thumbnail grid and click on Theme Details. When the Modal pops up, look at the bottom right corner and click Delete.
What are Plugins in WordPress?
In simple words, plugins are like apps for your WordPress website. They add new features to WordPress website.
There are almost 60,000 free plugins currently listed in the WordPress plugin repository (https://wordpress.org/plugins/) and more plugins are being developed every day.
Here are some popular plugins for WordPress and their purpose;
- Elementor – A WordPress no-code web page builder which is used for creating web pages very fast. It allows for real-time page editing as you watch your changes
being updated while designing pages. - WP Forms – This plugin allows you to build frontend forms that can be used to collect and process user input right from your website. WP Forms has advanced features such as
syncing of emails to a Mailchimp list, integrating with an automation tool called Zapier, and syncing contacts into a designated Google spreadsheet. - Elementor Plugins: These are plugins that can be used to extend the features of the Elementor Page Builder Plugin. That’s funny right? A plugin is being used to extend the features of another plugin. Well, that’s quite common in the world of WordPress. Examples of popular Elementor Plugins include but are not limited to; Premium Addons for Elementor, Essential Addons for Elementor, Elementor Header & Footer Builder, ElementsKit Elementor addons, and Livemesh Addons for Elementor.
- WooCommerce: Used to add e-Commerce and inventory management functionality
to a WordPress website. - Paystack: Used to collect Payments via Nigerian debit cards using Paystack payment gateway without users leaving your website.
- WhatsApp Checkout: As the name implies, it allows customers to shop on your ecommerce website and checkout on WhatsApp. You’ll get a list of every item bought, units per item, and total price. Then you can discuss payments and delivery via WhatsApp.
So many free plugins for the same thing! Na you go taya!!
Using WordPress will make you feel like a bunny standing before a heap of carrots. There are too many free solutions for the same problem and that’s why I like it.
Do you want to build web pages without code? WordPress even has a myriad of other web page builders asides from Elementor.
| Page Builders | Form Plugins | Caching Plugins | Security |
|---|---|---|---|
| Elementor | WP Forms | Litespeed Cache | WordFence |
| WP Bakery | Caldera Forms | W3 Total Cache | All in One WP Security |
| Divi | Ninja Forms | WP Fastest Cache | iThemes Security |
| Oxygen Builder | Formidable Forms | Autoptimize | WP Cerber Security |
| Site Origin | Contact Form 7 | Jetpack | Sucuri Security |
There are other essential categories of WordPress Plugins that can be used to extend your website’s functionality. Each category contains multiple plugins to choose from.
TIP: Never install two plugins doing the same job. In other words, avoid using two plugins from the same category. This can result in a plugin conflict and it may break your website.
Here are other Plugin categories;
SEO – SEO Plugins are used to boost and optimize a website on search engine results. Examples of WordPress SEO plugins include RankMath, Yoast SEO, and All In One SEO.
More Categories that feature thousands of WordPress plugins include:
Developer Plugins, Analytics, Backups, Popups, Social Media, Galleries, Membership and User Management, Booking and Appointment, Galleries, Live chat, you just name it!
Don’t worry, as time goes on, you’ll inevitably start to form some personal preference toward some plugins and “dislike” towards others. In no time, you will soon know the best of the best plugins to use in your projects.
There is a website known as CodeCanyon. It features thousands of premium WordPress plugins. There are almost no free plugins there, but you could just browse them and read the plugin descriptions to have an idea of things that WordPress can do. Just have a look here https://1.envato.market/pluginlist.
How to Install a Plugin On WordPress
As mentioned previously, WordPress Plugins are like apps that you install on your phone to extend its functionality. Similarly, on WordPress, plugins help you extend the default functionality.
Installing plugins in WordPress is pretty simple and straightforward:
From your Admin dashboard, go to Plugins » Add New.
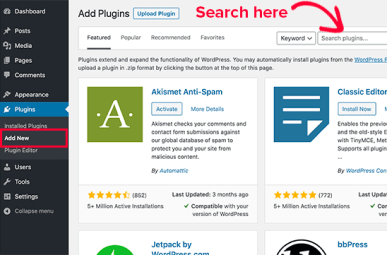
Search your desired plugin by using the search bar indicated above. In this example, we want to install a plugin named WPForms

When you’ve seen your desired plugin among the search results, click on Install Now and wait for the installation to complete.

Once installation is complete, click on the Activate button as shown in the picture above.
That’s all! Congratulations, you just installed and activated a WordPress plugin.
THINGS TO KNOW
- You can deactivate a WordPress plugin to temporarily get it to stop working. This can be useful when you are trying to avoid a conflict when trying out another plugin that
does the same thing. - Deactivated plugins are as good as deleted plugins, the difference is that your data and settings are still preserved in the case of deactivated plugins pending when you reactivate them. It is also quite easy to activate it again when needed without having to go redownload them from the Plugin repository.
- There are at least 3 ways of installing plugins in WordPress; 1. Through FTP, 2. Through Uploading the plugin ZIP file right from the Plugins page of your WordPress Dashboard 3. The third method is the one we have just covered, and that should be more than enough for now..
Installing the Required Plugins
Now you know how to install a plugin in WordPress, We need to install all the plugins required to start our own project.
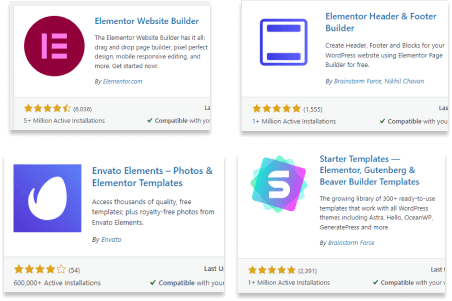
Since you already know how to install and activate plugiins, I need you to install and activate the following 4 plugins:
- Elementor – We’ll use this for building and editing web page.
- Elementor Header & Footer Builder – We would use this to build custom header and footer block.
- Envato Elements – This plugin helps us to import blocks or sections into our pages while editing or creating them in Elementor so that we don’t always have to create everything from scratch.
- Starter Templates – This plugin helps us to build websites very fast by importing from a list of over 300+ premade website templates. All you need to do is choose a free template and the plugin would walk you through the rest of the template import process. We can then use Elementor to edit the imported pages one after the other. This plugin is very powerful, it may install themes and activate them for you in the background, thereby changing your active theme. Anyway, highly recommended!
What Are Themes in WordPress
A theme in WordPress is a bundled group of graphic files that can be used to change or alter the visual look and feel of any WordPress Website.
WordPress has thousands of free themes in its free theme repository, and tens of thousands of premium themes in the Envato Market (https://1.envato.market/viewthemes). Installing a theme is very similar to the way we install plugins, except for a few differences;
- You can’t activate two themes at a time but you can have mutiple plugins activated at any given time.
- Themes have a different repository (Appearance > Themes > Add New) to Plugins (Plugins > Add New). Well, it’s a good thing if I must say.
- Themes deal with Visual changes only, while Plugins is primarily focused on extending functionality.
- Even though Plugins are focused on website functionality, they still have the power to alter your website’s visual appearance. But themes do not have the power to independently add functionality to any website on their own, instead, they depend on a combo of plugins to assist with that.

As you can see in the picture above, this “premium” theme is “begging me” to install the following plugins in order to work as expected. You might need to zoom in to have a better view though. “Classy beggy” languages like “This Theme recommends Plugin 1, Plugin 2, etc” or “The following plugins are Required: Plugin 1, Plugin 2, etc” are used to prompt you to install those required and recommended plugins in order for some themes to work properly.
But Plugins will “never beg” for a theme to be installed in order to work. Though they perform different duties (Plugin = Functionality, Themes = Visuals), WordPress plugins are still more independent than WordPress themes.
I hope that makes sense to you? If it doesn’t, don’t beat yourself too hard, you will soon start to relate very well to these things as you continue to build with WordPress.
Installing the Required Theme
Installing themes in WordPress is very similar to installing Plugins (Install, Activate). The difference in the installation process is that themes can be found in the themes directory which can be accessed by navigating to Appearance > Themes > Add New. while Plugins can be found in the plugins directory which can be accessed by navigating to Plugins > Add New.
Just for the purpose of learning, let’s try to install and activate a theme named “Hello Elementor”.

TIP: To understand the effect of changing your WordPress theme, load your website homepage before changing the theme and then check again after activating the new theme.
From your WordPress Admin Dashboard:
- Navigate to Appearance > Themes > Add New
- Use the Search bar to search for “Hello Elementor

- Click on Install and wait for the installation to finish.
- Click Activate to activate the theme.
Congratulations! You have just installed and Activated a Free WordPress theme from the Themes directory.
Creating Pages In WordPress
There are many methods of generating or creating web pages in WordPress. In fact, aside the many page builders that we have, WordPress has it’s own internal page builder known as Gutenberg Block Editor or simply Gutenberg. However, the best WordPress page builder known to man is Elementor.
What is Elementor?
I have already told you twice before what Elementor is all about, so I am instead going to tell you why people love to use elementor:
- Elementor is the easiest to grasp of the page builder
- It delivers the most features for free
- It has lots of free third-party plugins that can be used to extend its features (Premium Addons for Elementor, Essential Addons for Elementor, Elementor Header & Footer Builder, ElementsKit Elementor addons, and Livemesh Addons for Elementor, etc.
- Updates are applied in real-time and the page editor preview doesn’t look any different
from the actual web page when viewed.
Creating Your Website Homepage Using Elementor
Elementor is, at its core, a WordPress plugin – albeit a more advanced one. You must first install and activate it before it can function (I hope you have done that). These are all the typical procedures for any WordPress plugin. Creating the HomePage is just like creating any other page. Fortunately, WordPress has a setting that allows us to define which of our created pages should be the homepage, but we are coming to that. What we should be concerned about now is CREATING PAGES and editing them with Elementor.
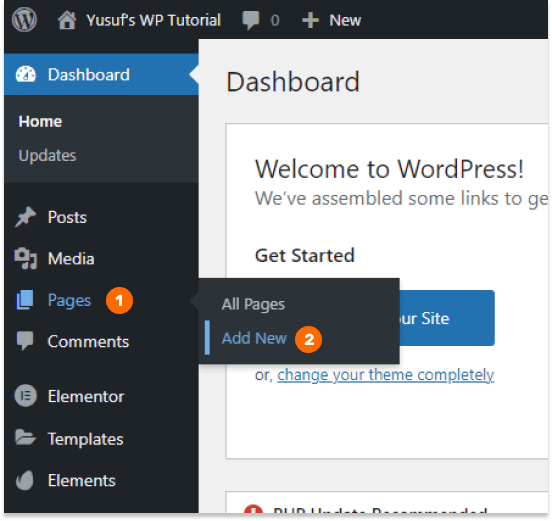
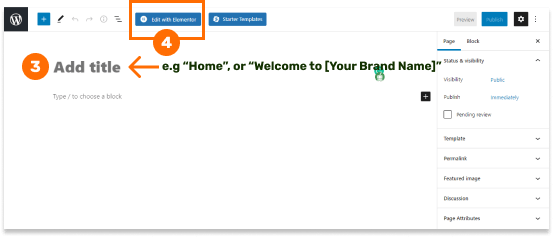
So, to create the homepage, we just need to create a page and then edit it with Elementor. To do this, go to your WordPress Pages menu, > then Add New, and you’ll see the option to ‘Edit with Elementor’ right away.

HEADS UP: I will do less talking and more of screenshots henceforth. So do exactly as shown in the screenshots. I would use numbered markers to identify the order of clicks.
Breakdown of Elementor’s Page Editing User Interface
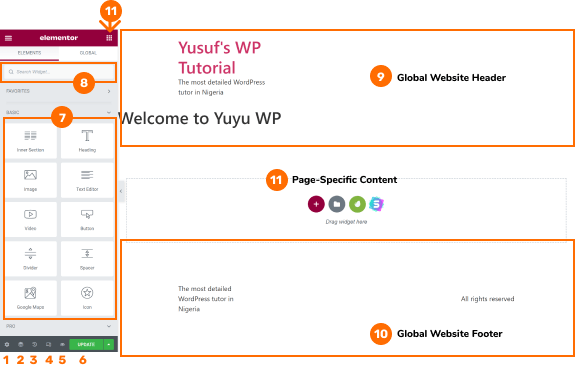
- General Settings – Used to edit the Page title and other Page-specific settings such as Layout. (Not frequently used).
- Navigator – Used to display an overview of all the page content in their order of appearance from top-bottom. (Frequently used).
- History – Used to revert back changes even when you have recently saved your changes and closed Elementor (Revisions). (Not frequently used)
- Responsive Mode Settings (PC, Tablet, Phone) – Used to test, preview and switch design modes to make your web pages to fit in various displays (PC, Tablet and Smartphone).
- Preview changes in another Tab – Clicking on it opens your progress in another browser tab and helps you preview how it looks like when Updated. (ie., when the changes have been confirmed)
- Update changes – Self explanatory. It is used to confirm your changes.
- Widget Pane – It contains commonly used widgets (such as Inner Section, Spacer,Line Divider, Photo, Icons, Icon Lists, Text Widget, Headings, Custom HTML, Accordion, Buttons, etc that can be dragged and dropped into the page-specific content area.
More widgets can be added by installing Elementor Plugins - Widget Search bar – This is used to quickly search for a widget instead of scrolling through the long list of widgets in the Widget Pane. (Frequently Used
- Website’s header – The global header of the website. It is termed “Global” because it stays the same regardless of the Elementor page you are editing. The website header is expected to contain elements like Navigation Menus (Main menu and dropdowns) Website Logo, and maybe, social media icons
- Website Footer – The global (site-wide) footer of the website. It is termed “Global” because it stays the same regardless of the Elementor page you are editing. The website footer is expected to contain elements like Footer links, Website Footer Logo, social media icons, contact address, and Copyright text.
- Page-specific Content Area – This is the page’s main content area. It is called “Pagespecific” because, unlike the header and footer, the content area will need to change on a per-page basis, depending on the title and purpose of the page. You know, the home page content has to be different from the “About Us” Content.
We Need To Start Adding Content to Our Home Page
That’s enough introduction of the Elementor user interface for now. We’d definitely get more familiar with it as time goes on. But now, we need to start adding content to our website’s Home page.
By content, I mean widgets that define the page; such as sections, hero header, images and text, CTA buttons, links and so on.
For reference, refer to the page titled “Anatomy of a Website” page at the beginning of this book.
Adding the Hero Section
We will address the website’s header and footer later but let’s design the Hero section first. This is where our Envato and Starter Template plugins would come in handy. These plugins help us build our website by allowing us to import what is known as “Blocks” into the sections, then we can edit them as needed.
WHY THE HERO SECTION IS IMPORTANT
What is a business/corporate website without a hero section on the homepage? I can’t Imagine! The Hero section is the first and most important section of the homepage because it provides the chance for a business or brand to pitch itself in a very succinct, yet convincing manner. It can also give a hint on what the website is all about.
Here are some examples of Hero Section;


Building Our Own Hero Section from Scratch (Hard)
I am sorry, not so soon. Before you start using Elementor to build anything at all, you need to pay attention to “Sections” and “Columns.”
Sections and Columns are the building blocks of any website; Whether built with Elementor, HTML or any other coding language. Because of this, you must know how to create and manipulate Columns and Sections in Elementor. Columns and sections are very different in dimension. You must also know when to use what.
A Section is always Horizontal (wide, going both sides of the screen), and when it occurs, it is always a “mother” to 1 or more columns. What does this mean? It means that columns can’t exist on their own unless they are inside sections. Think of an unborn child (Column) in her mother’s womb (Section).
Click “UPDATE”, close your browser and take a 1-hour rest.
If you ever need to resume editing the page, just log in to your WordPress dashboard, click Pages > All Pages. Hover your cursor on the page of interest, and click Edit with
Elementor.

Save Changes and Take a Break.
You’ve now learnt some common default WordPress settings that you need to change. You know how to install and manage WordPress Themes and Plugins, and you can now create and delete WordPress pages and posts.
We are currently building our Website’s Homepage from scratch using Elementor.
Click “UPDATE”, close your browser and take a 1-hour rest.
If you ever need to resume editing the page, just login to your WordPress dashboard, click Pages > All Pages. Hover your cursor on the page of interest, and click Edit with Elementor.
If you are enjoying this book, join the Facebook Group [Building WordPress Websites With Yusuf – BWWWY] to post any reviews, or questions which you may have.
All You need to know about Sections & Columns in Elementor


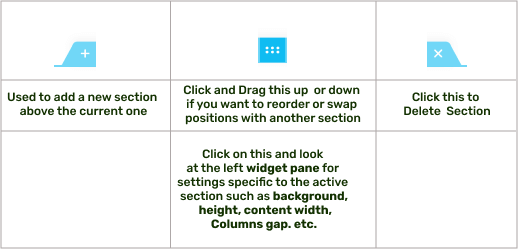
Breakdown and functions of the section handles
TIP: Right-click any of the three section’s controls to open the context menu specific to that section. There, you can do things such as Duplicate, or Copy the whole section. Right-click the column handle to open the context menu specific to that column.
 This is the Column handle. You can:
- Drag it left or right to swap the column position with another column within the same section
- Right click on it and click “Add New Column” If you need to add additional columns inside a section.
Good! Let’s build Our Hero Section Now
We want to achieve a hero section something like this

We can make the following observations from the Hero section shown above:
- The Hero above has two columns.
- An Image on the right column, and text (Heading & paragraph) on the left column.
To achieve this, it means we need to create a section with two columns.


We have just added a section with two columns, but we need to increase the height of each columns. To do that, we’re just going to set a minimum height property for the section (the mother).
Click on the first section handle ![]() and look at the widget pane for the column settings. See image below for reference.
and look at the widget pane for the column settings. See image below for reference.
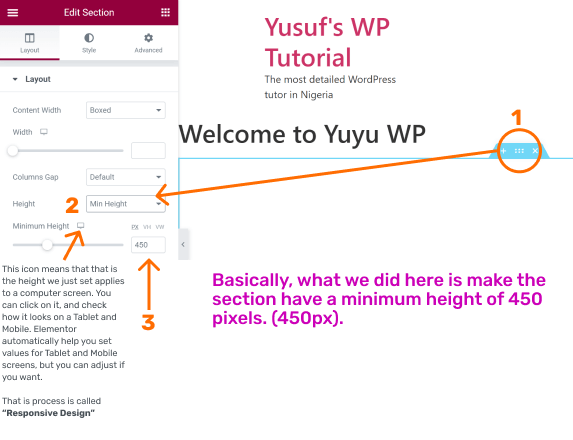
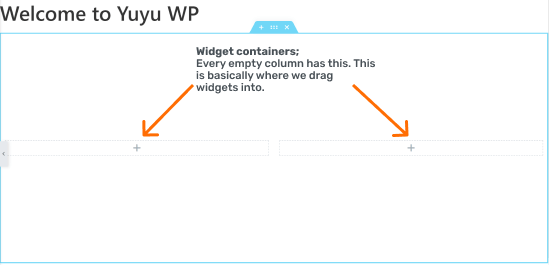
When done, the section should look tall; something like this. Good!
Now, Drag the required Widgets into columns.
Elementor has lots of widgets in the Widget Pane. You must know which one to use. But it is quite intuitive and very easy to guess.
The image below is a screenshot of our reference Hero section. We must guess correctly what widget was used! But it’s quite easy and intuitive.
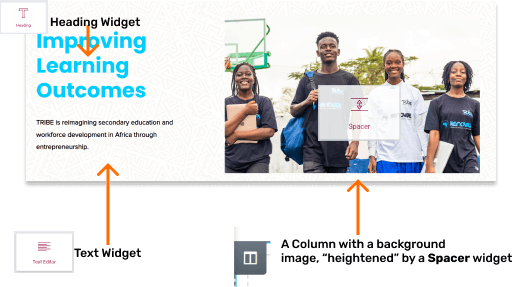
This could easily be confused with an image widget. But it is actually an empty column with a background image. The empty column is then made tall by adding a Spacer Widget inside it. You could have simply used an Image Widget, but it is not structurally ideal in this case. That’s an amateur design thinking.
The best option is using a column with background image because not only does it give our design more structural integrity, it also gives more customization options. For example, we might like to make the backgroud interchange like a slider, but if we used an image widget, we would not be able to do that.

Time to start dragging the relevant widgets into their columns.
Aside from just dragging the widgets into their columns, We’d also need to style them to our taste. By saying “style them to our state”, what I mean is that we would need to change things like font-style, color, font-size, etc, until we are satisfied. We might also change border properties of the column such as drop shadow and border radius (Roundness of corners). Keep following, I’ll show you how.
SUGGESTION: Let’s drag all the widgets into their columns before styling them one after the other.
Elementor has done well to rank more commonly widgets used first. That’s why you’d notice that most of the widgets we need to create the hero section are on top of the pecking order. That’s good because there would be no need to scroll too deep to get to them. Just look at the image on the left (below) and compare it to what you see on your Elementor screen;
