You have just bought a domain and hosting on Namecheap but you don’t know what next to do with them. Do you wish to learn how to install WordPress in NameCheap via cPanel?
My name is Yusuf Odukoya, Senior Web Designer at Branditechture. The purpose of writing this article is to show you a step-by-step guide to installing WordPress using Namecheap cPanel.
NOTE: This guide assumes that you have both your domain name and hosting plan in the same Namecheap account.
So, how do I get WordPress up and running on NameCheap?
To install WordPress, you’ll first need to log in to your Namecheap cPanel account. It was a little terrifying when I first installed WordPress on Namecheap, but it shouldn’t necessarily be the same for you.
So, based off my experience, I’ve devised a method for installing WordPress with NameCheap cPanel. It is quick, error-proof, and simple. Let’s begin!
Before you start…
Yes, before you start, you need to check a certain DNS setting. This is one of the very first steps to installing WordPress on Namecheap. Don’t fret, I’ll show you where to check that setting. This setting is important in other to correctly point your domain name to the hosting where WordPress would be installed.
Simply log in your Namecheap account by visiting https://ap.www.namecheap.com and navigate to the Domain List tab. Next, click the Manage button for the domain name you want to use to access your website.
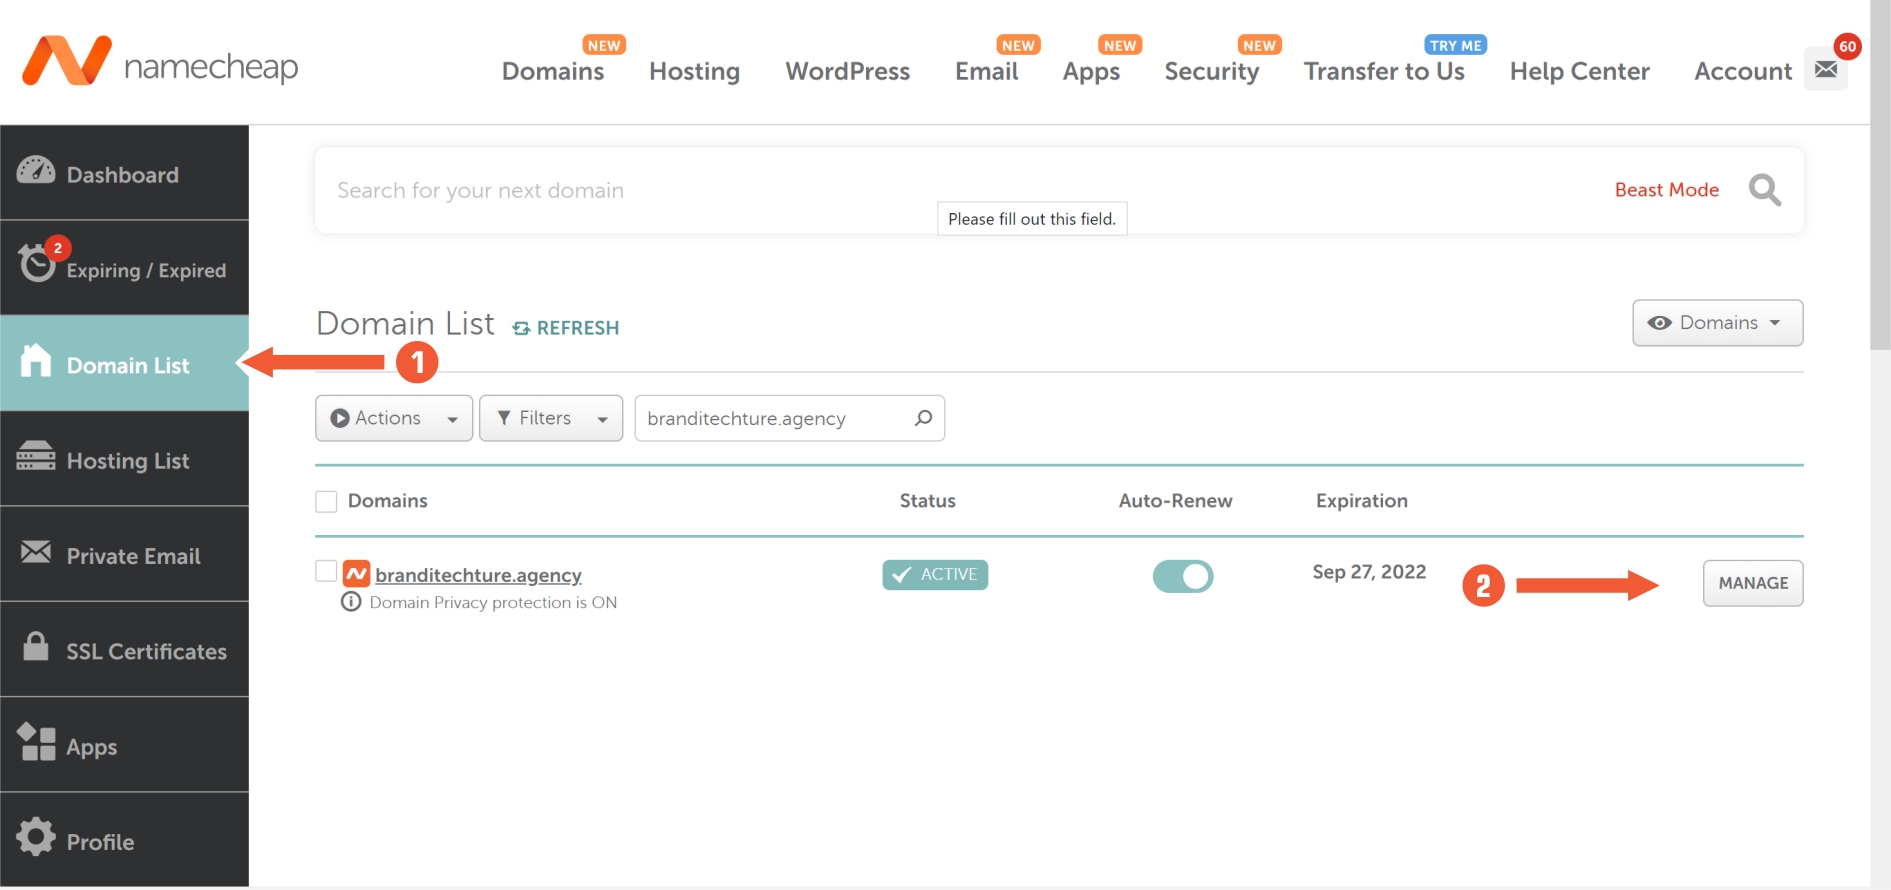
Checking Namecheap DNS Settings
Good! Now check to make sure that the Nameserver dropdown menu is set to Namecheap Web Hosting DNS. Make sure you click the teal-colored tick icon to save your changes. In most cases, you may find that it is correctly set to Namecheap Web Hosting DNS by default. In that case, no change would be required.
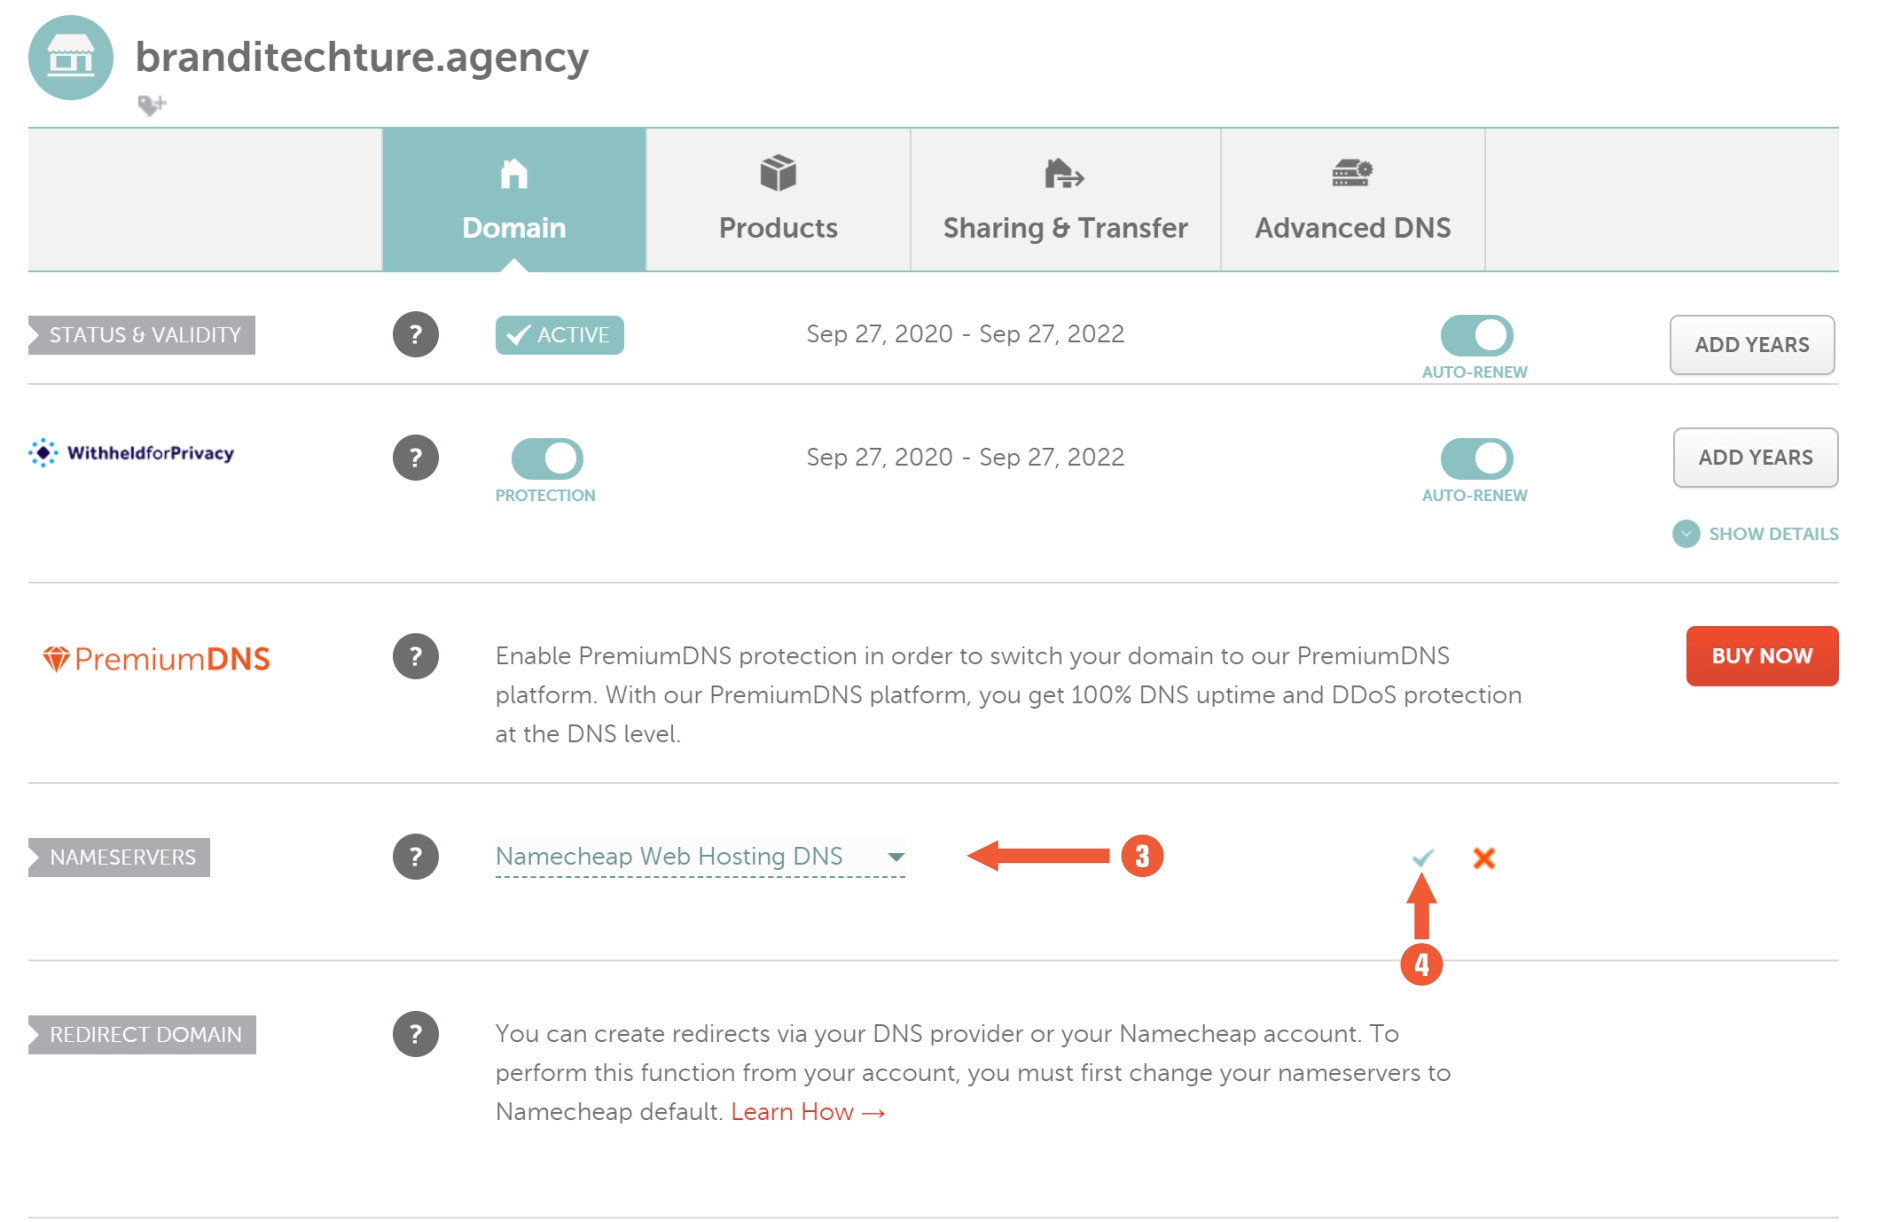
Make sure it’s set to “Namecheap Web Hosting DNS”
But if you make any change, it may take up to 48 hours for the new Nameserver settings to be updated. In my experience with Namecheap, though, it just takes 3/5 minutes rather than 48 hours.
Once you’ve made sure that the Nameserver setting is set to Namecheap Web Hosting DNS, then it’s time to begin the WordPress installation procedure.
Installing WordPress in Namecheap cPanel

How to Install WordPress in Namecheap cPanel
There are a couple alternative ways to install WordPress on NameCheap, but I’ll show you the simplest one which is also less prone to errors. Let’s get this party started!
Step 1: Log Into Your Namecheap Account:
Simply log in your Namecheap account by visiting https://ap.www.namecheap.com. Then navigate to the Product List tab. Next, click the GO TO CPANEL button for the hosting you want to install WordPress on.

Click Hosting List, then GO TO CPANEL
Step 2: Look for the Softaculous Apps Installer:
You’d be taken to your cPanel home screen after clicking the button in step 1 above. The next step is to locate and click the Softaculous Apps Installer. As the name suggests, the Softaculous Apps Installer is used to install apps on your domain. One of them is WordPress.
Subscribe for updates

Look for Softaculous Apps Installer and Click it
Step 3: Install WordPress:
Now that you are in the Softaculous Apps Installer grid menu, simply install WordPress by clicking the Install button on the WordPress card.
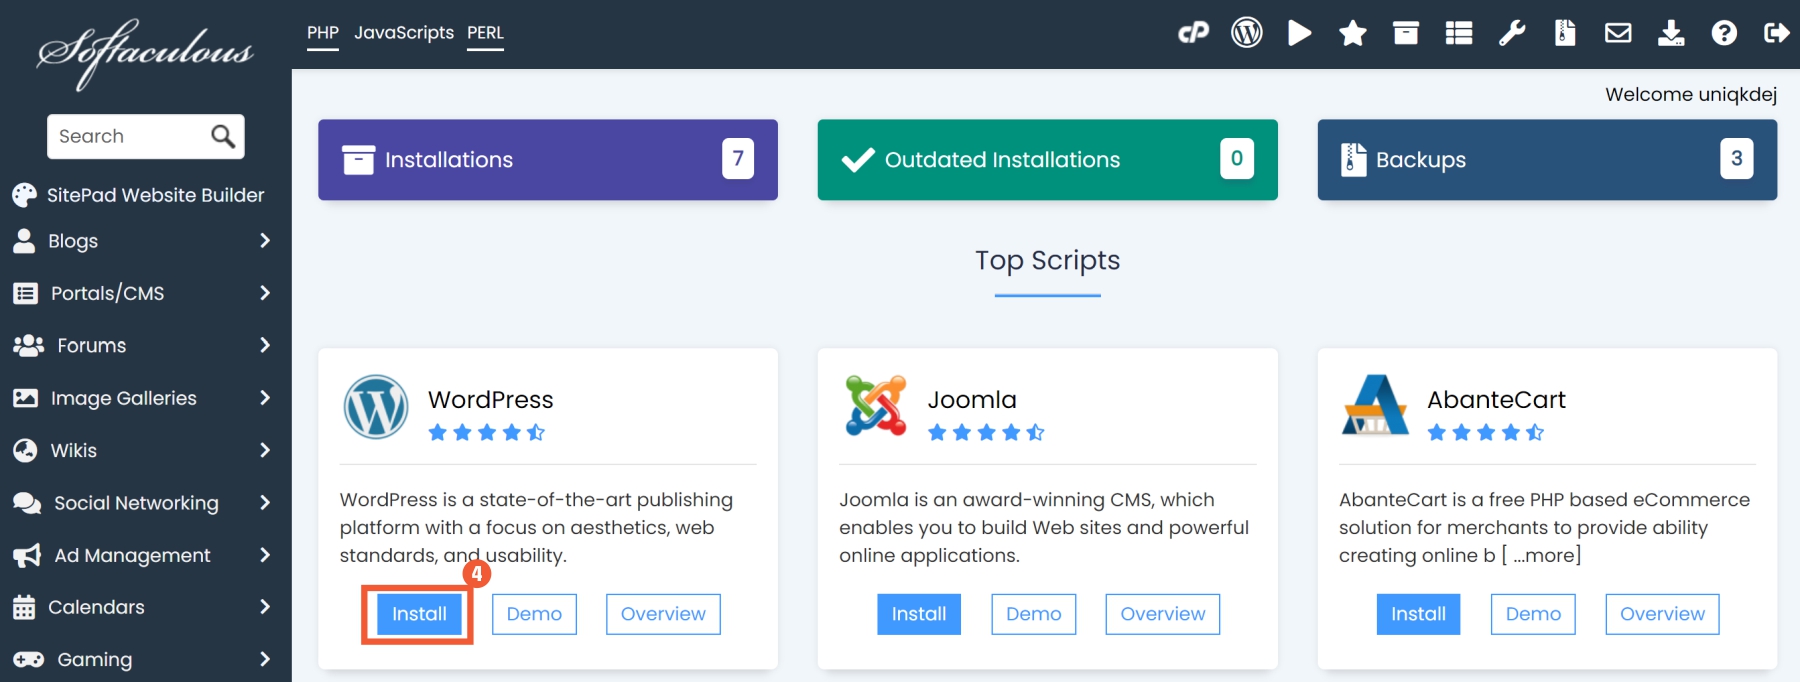
Click the Install button on the WordPress card
You will be taken to the WordPress installation page.
Step 4: Start the WordPress Installation Process:
Now you can start the WordPress installation process. Let’s look at each section separately.
#1. Software Setup
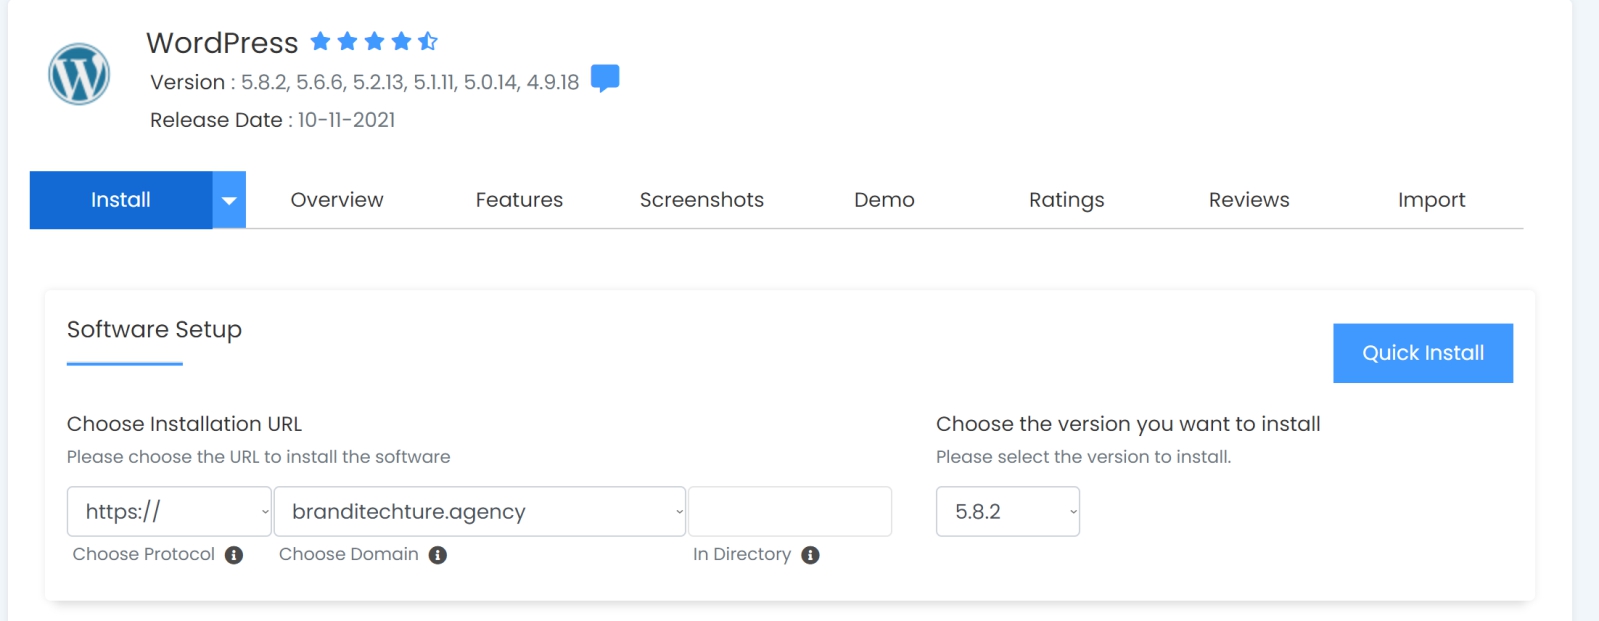
Software Setup Section
Select a Protocol: This is, in a nutshell, your website’s URL address. If your site uses SSL, you should choose one of the options that starts with HTTPS://; if it does not, you must choose “HTTP://”. Well, if you try to choose HTTPS:// when your site doesn’t have a valid SSL Certificate, it would warn you.
📝TIP: Always choose HTTPS:// unless you get a warning.
With namecheap, there’s a very good chance that SSL is already installed on your site by default. You really don’t have to be concerned about SSL because Namecheap hosting provides FREE SSL for the first year.
Select a Domain Name: In this section, you must select the domain name on which you want to install WordPress. If you have multiple domain names registered within the same Namecheap account, you’d have to select your preferred domain from the dropdown, otherwise, your only domain will be selected by default.
In the Directory, I strongly recommend leaving it blank.
#2. Site Settings
Site Name: Essentially, this is where you choose the name of your website. For example, the name of this website is “Branditechture”
Site Description: It allows you to enter more information about your site in a single line. A short sentences should be used to describe your website.
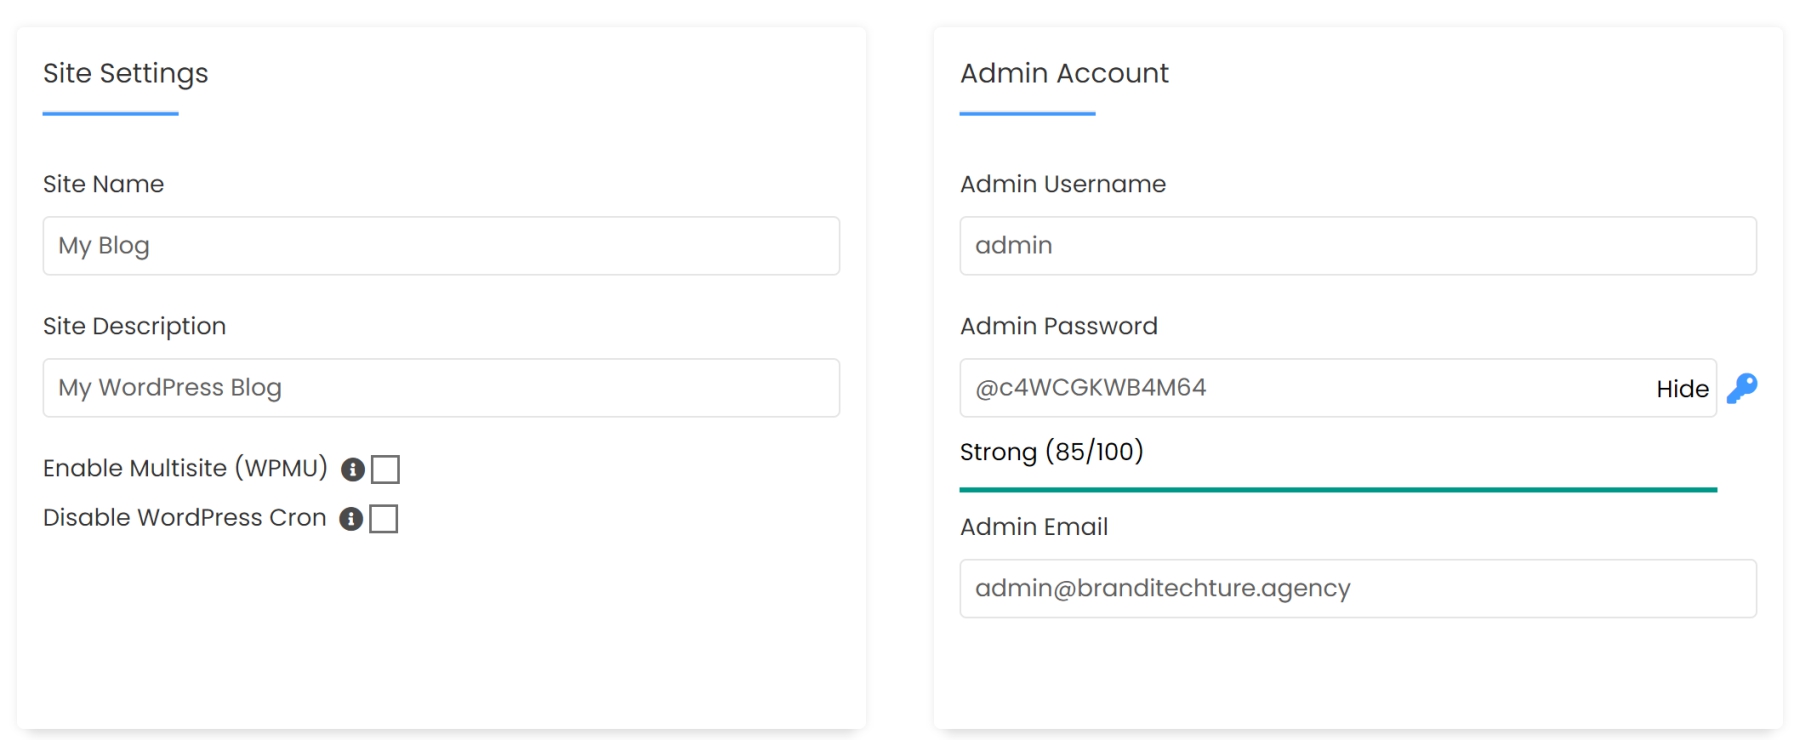
Site settings section
Leave the “Enable Multisite” and “Disable WordPress Cron” tick boxes unchecked.
#3 Admin Account
In order to be able to log in to the admin dashboard of your WordPress site, you must first set up your admin Username, Password, and Email. The password and username should be carefully chosen. Choose a password that is hard for others to guess but easy for you to remember.
#4. Select a Language
The term “choose language” is self-explanatory.
#5: Choose Plugins
Essentially, these choices are entirely dependent on your particular preferences but I would suggest you leave it unchanged.
#6. Advanced Options
Disable Update Notification is one of the more advanced options. Where you can change upgrade options such as Auto Upgrade, Backups, and so on.
I strongly advise you to leave these portions alone. For your site, the default options are more than adequate.
#7. Optionally choose a theme and click “Install”
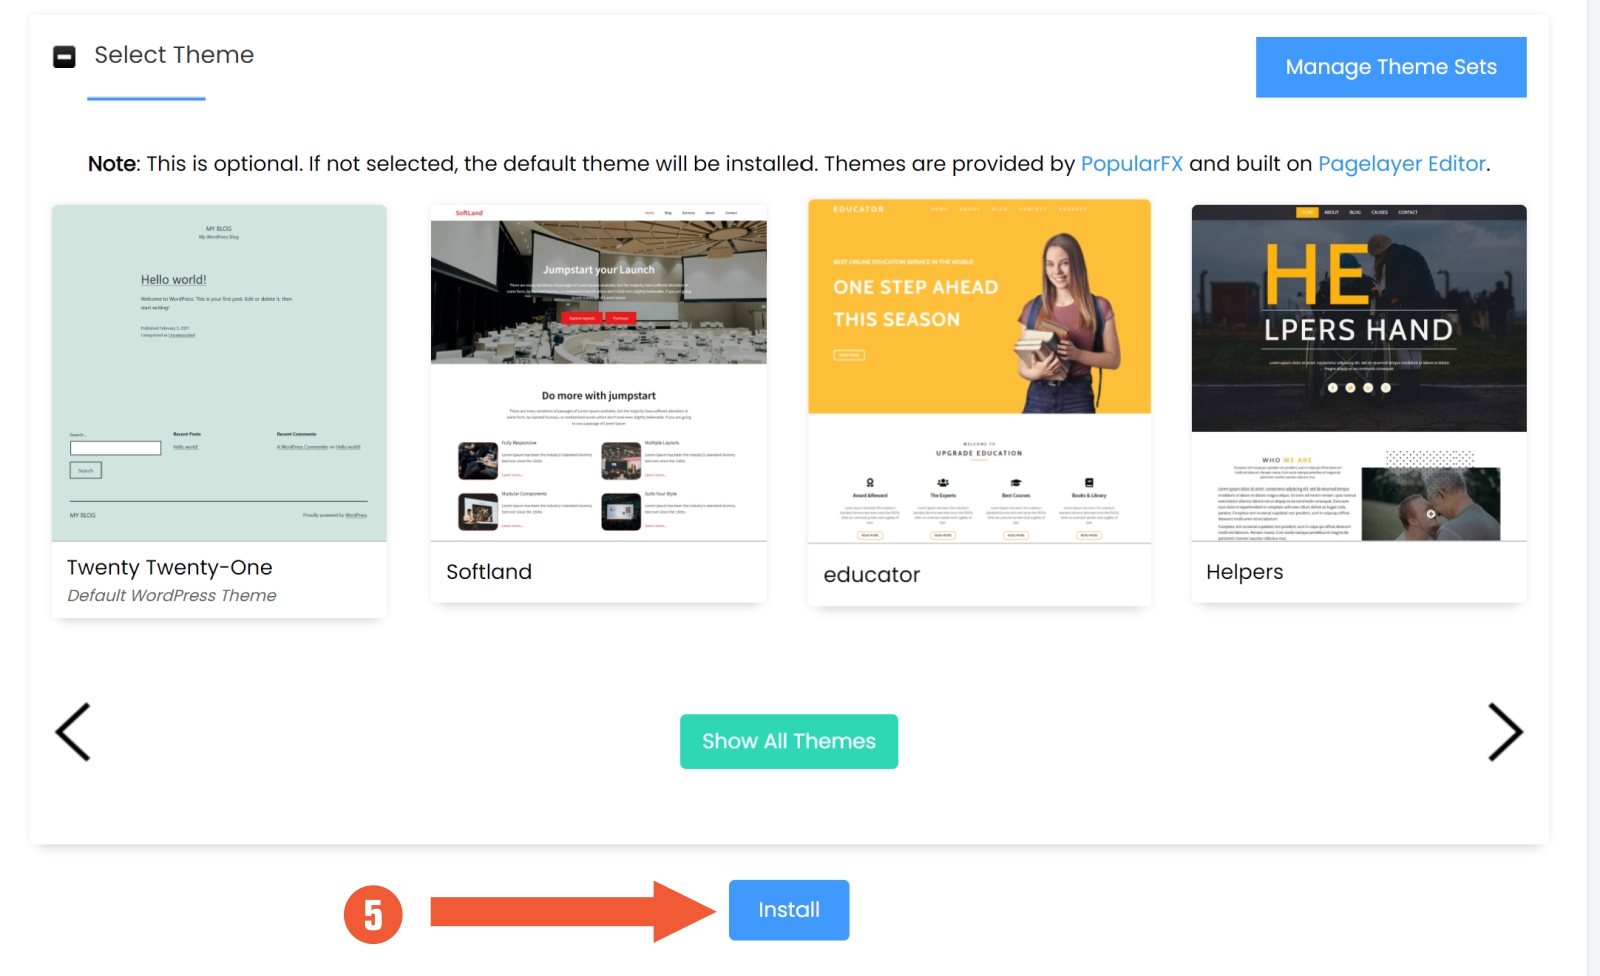
Finally click the Install button
You’ve reached the end of the WordPress setup procedure. Now you can optionally choose a WordPress theme, enter an email address to get information, and finally click on the Install button.
The installation process will take a few seconds after you click the install button.
Step 5: Go to WordPress and log in.
If everything goes as planned, you should have successfully installed WordPress. Congratulations!
The login address for WordPress websites is http://yourdomain.com/wp-admin by default.
Yourdomain.com must now be replaced with your actual domain name. Now that everything has been completed, You can log in to your WordPress site now.

