One of the most annoying mistakes MTN made with their latest MiFi device is putting the sticky paper label OUTSIDE the body of the MiFi device. Perhaps, this could be because this particular Mi-fi model has no removable battery cover, but they could have at least, laminated it. The sad news, however, is that many MTN Mi-Fi owners have lost the default WLAN Key written on the sticky label due to the rubbing off of the ink used to print the details.
But do not fret… My name is Yusuf Odukoya, and as a freelancer and digital guy myself, I understand that losing that little sticker with your WLAN key can be quite frustrating. I have got you covered with this simple and effective solution to regain access to your Wi-Fi connection by checking or setting a new WLAN Key.
In this step-by-step guide, I will walk you through the process of resetting or checking your MTN MiFi WLAN key (Also known as WiFi password) using just a USB cable and your computer. Whether you’ve got the latest MTN Mi-Fi model or an older one, this method just works for ALL MTN Mi-Fi models. So, let’s dive in and get your Wi-Fi back up and running!
Materials You’ll Need:
- Your MTN MiFi device
- A USB cable
- A computer or laptop with a web browser
Step 1: Connect MiFi to Your Computer Start by powering on your MTN MiFi device. Then, take your trusty USB cable and connect your MiFi device to your computer. Ensure the connection is snug and secure.
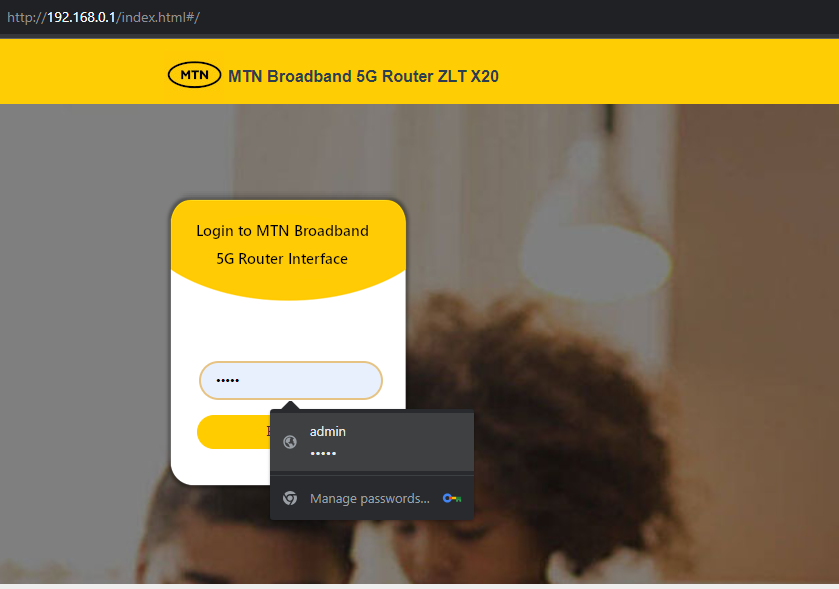
Step 2: Accessing the Web Interface Open up your favorite web browser on your computer—whether it’s Chrome, Firefox, Edge, or another. Now, in the address bar at the top, type in the following: 192.168.0.1 and hit Enter. This magical combination of numbers will lead you to your MiFi device’s settings.
Step 3: Logging In
You’ll be greeted by the MTN MiFi web interface. Sometimes, it might ask you for a username and password. If you’ve never changed these before, no worries! The default credentials are often “admin” for both the username and password. Go ahead and enter those in.

Dashboard login page
Subscribe for updates
Step 4: Finding WLAN Settings
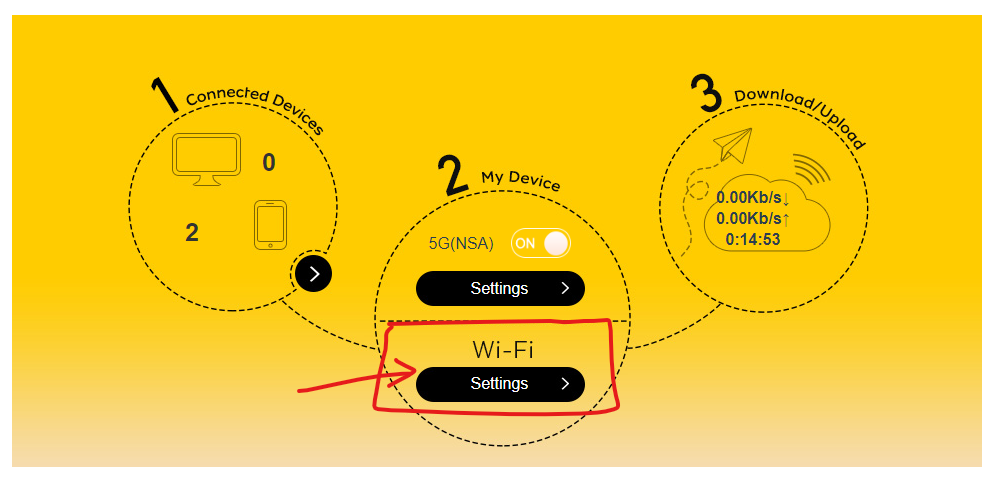
Now comes the fun part—finding the section that’s all about your Wi-Fi settings because this depends on your MiFi or router model. You must look for labels like “WLAN Settings,” “WiFi Settings,” or something similar. Once you’ve located it, click on it.
Here’s mine:

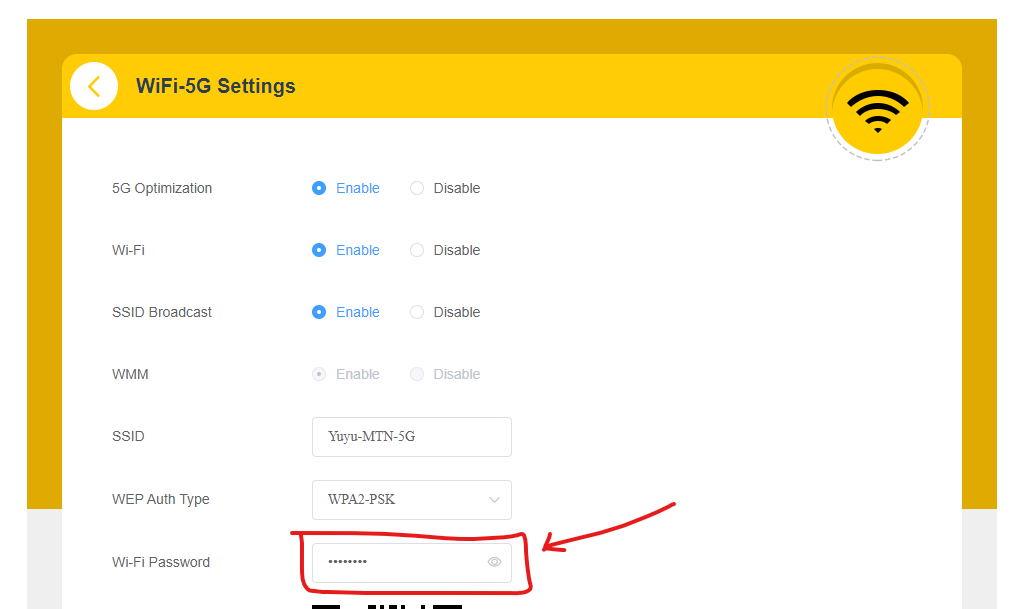
WiFi Settings
Step 5: Generating a New WLAN Key
Inside the WLAN settings, you’ll find an option to generate a fresh WLAN key or password. This could be called “Security Key,” “Password,” or “WPA Key.” Click on that option and follow the instructions to generate a new key. If you’re feeling creative, some devices might even let you create your own.

Updating your WiFi password
Step 6:Saving Your Changes
After you’ve generated or updated your WLAN key, it’s time to save the day! Look around for a “Save” or “Apply” button on the web interface. Click it with confidence, knowing that your changes are about to be locked in.
Step 7: Disconnect, Restart, and Reconnect
Safely disconnect your MTN MiFi device from your computer. Now, give your MiFi a moment of rest by turning it off and then back on. Wait patiently for it to fully reboot. Once it’s up and running, connect to your MiFi’s Wi-Fi network using the new WLAN key you’ve just set.
Conclusion: And there you have it, a straightforward way to reset your MTN MiFi WLAN key and reclaim your Wi-Fi connection. Remember, this guide is your trusty companion whether you’re using the latest MiFi model or an older one. The next time you find yourself without that precious sticker, just grab your USB cable and computer (or laptop) and follow the above steps to restore your connection in no time.
Happy browsing!


